Mastering Roof Installations: Step-by-Step Tutorials for the DIY Enthusiast
Embarking on a roofing project can be a daunting task, but with the right guidance, you can transform it into a rewarding DIY experience. In this comprehensive guide, we will walk you through the essentials of mastering roof installations, providing step-by-step tutorials tailored for the DIY enthusiast. From understanding the various roofing materials like asphalt shingles, metal, and tile, to learning the best practices for maintenance and early damage detection, this resource is designed to empower homeowners with the knowledge and confidence needed to tackle their roofing projects. Whether you’re looking to extend the lifespan of your roof through regular upkeep or ready to dive into a full installation, our detailed insights and practical tips will position you for success. Join us as we explore every facet of roofing, ensuring your home remains protected and visually appealing.

Essential Roofing Materials
Asphalt Shingles: Pros and Cons
Asphalt shingles are a popular choice for residential roofing due to their affordability and ease of installation. They come in a variety of colors and styles, making them versatile for different architectural designs. One of the primary advantages is their cost-effectiveness, which makes them accessible for many homeowners. Asphalt shingles are also relatively easy to replace and repair, which can be beneficial for long-term maintenance.
However, they do have some downsides. Asphalt shingles typically have a shorter lifespan compared to other materials like metal or tile. They are also susceptible to damage from extreme weather conditions, such as high winds or hail. Additionally, asphalt shingles can be less environmentally friendly due to the petroleum products used in their production. When considering asphalt shingles, it’s essential to weigh these pros and cons to determine if they meet your specific roofing needs and expectations.

Metal Roofing Benefits
Metal roofing offers numerous advantages, making it an increasingly popular option for both residential and commercial properties. One of the primary benefits is its durability. Metal roofs can withstand harsh weather conditions, including strong winds, heavy snow, and even hail, without sustaining significant damage. This resilience translates into a long lifespan, often lasting 40 to 70 years with proper maintenance.
The energy efficiency of metal roofing is another significant advantage. These roofs reflect solar radiant heat, which can reduce cooling costs by 10-25% during warm months. Additionally, metal roofing is environmentally friendly. It often contains a percentage of recycled materials and is fully recyclable at the end of its life cycle.
Installation costs for metal roofing can be higher than other materials, but the long-term savings in energy efficiency and maintenance can offset this initial investment. For those prioritizing sustainability and longevity, metal roofing is a viable choice.

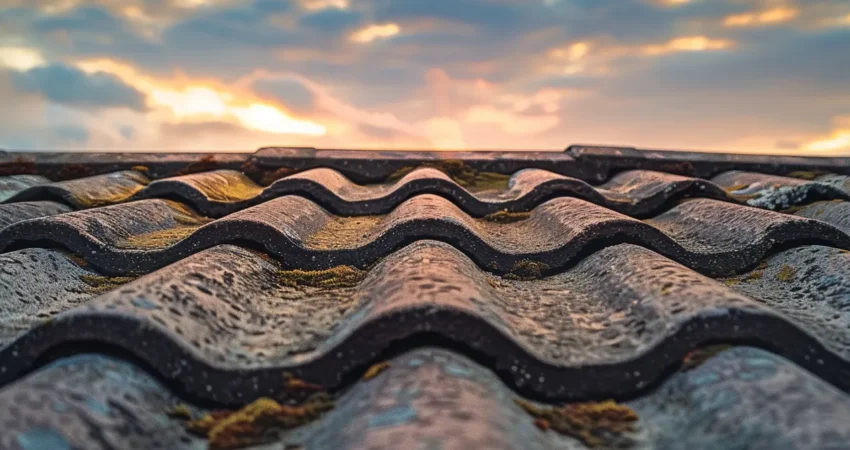
Exploring Tile Roofs
Tile roofs are renowned for their aesthetic appeal and durability. Made from materials such as clay or concrete, tile roofs can enhance the architectural style of a home, lending a classic or Mediterranean look. One of the key advantages of tile roofs is their longevity. With proper maintenance, they can last over a century, offering excellent long-term value.
Tile roofs provide natural insulation and are highly resistant to fire, rot, and insect damage. They perform well in hot climates, reflecting sunlight and maintaining a cool interior. This energy efficiency can lead to cost savings on air conditioning.
However, there are considerations to keep in mind. Tile roofs can be heavy, requiring a reinforced structure to support their weight. Installation can also be more complex and costly compared to other roofing materials. Despite these challenges, the durability and visual elegance of tile roofs make them a worthwhile investment for many homeowners seeking a distinctive and long-lasting roofing solution.

Best Practices for Roof Maintenance
Creating a Rooftop Maintenance Checklist
Creating a rooftop maintenance checklist is essential for ensuring your roof remains in optimal condition. Regular inspections and maintenance can prevent minor issues from escalating into costly repairs. Here’s a comprehensive checklist to guide you:
-
Visual Inspection: Start by examining the roof for visible signs of damage, such as cracked or missing shingles, rust spots on metal roofs, or broken tiles.
-
Gutter Cleaning: Ensure gutters and downspouts are free from debris, as clogged gutters can lead to water damage.
-
Flashing Check: Inspect the flashing around chimneys, vents, and skylights to ensure they are secure and free of rust or damage.
-
Moss and Algae Removal: Clean any moss or algae growth, which can deteriorate roofing materials over time.
-
Ventilation Check: Verify that attic ventilation is adequate to prevent moisture buildup and prolong the roof’s lifespan.
-
Professional Inspection: Schedule a professional inspection annually to identify any issues that may not be visible to the untrained eye.
By adhering to this rooftop maintenance checklist, you can extend your roof’s lifespan and safeguard your home from potential damage.

Regular Inspections and Cleaning
Regular inspections and cleaning are fundamental components of a robust roof maintenance program. Conducting inspections at least twice a year, ideally in the spring and fall, helps identify potential issues early. During these inspections, pay attention to any signs of wear and tear, such as loose or missing shingles, sagging areas, or debris accumulation.
Cleaning your roof is equally important. Remove leaves, branches, and other debris that can cause water to pool, leading to leaks and structural damage. Ensure gutters and downspouts are clear to facilitate proper drainage.
Algae and moss can also be problematic, as they retain moisture and can degrade roofing materials over time. Use appropriate cleaning solutions to remove these growths without harming the roof surface.
By incorporating regular inspections and cleaning into your routine, you not only maintain the aesthetic appeal of your roof but also enhance its functionality and lifespan, providing long-term protection for your home.

Importance of Proper Ventilation
Proper ventilation is crucial for maintaining the health and longevity of your roof. Adequate airflow in the attic space prevents moisture buildup, which can lead to mold growth and structural damage. During hot months, good ventilation helps to expel hot air, reducing the load on your air conditioning system and lowering energy costs.
In colder climates, ventilation plays a vital role in preventing ice dams. These are caused by heat escaping into the attic, melting snow on the roof, and then refreezing at the eaves. This can lead to water seeping under the shingles and causing leaks.
Proper ventilation can be achieved through a combination of intake vents (usually located in the soffits) and exhaust vents (such as ridge vents or gable vents). Regularly check these vents to ensure they are not blocked by debris or insulation.
By maintaining proper ventilation, you can extend your roof’s lifespan, improve energy efficiency, and prevent costly repairs.

Step-by-Step Roofing Guides
How to Install Asphalt Shingles
Installing asphalt shingles is a manageable project for the DIY enthusiast with the right tools and preparation. Here’s a step-by-step guide to get you started:
-
Preparation: Begin by removing the old roofing materials and repairing any damaged areas on the roof deck. Ensure the surface is clean and dry.
-
Install Underlayment: Roll out roofing underlayment or felt paper over the roof deck, starting from the bottom edge and overlapping each row by at least 2 inches. Secure with roofing nails.
-
Starter Strip: Install a starter strip along the eaves to provide extra protection against water infiltration.
-
Lay Shingles: Begin laying shingles from the bottom edge, aligning them with the starter strip. Use roofing nails to secure each shingle, placing them about 5/8 inch above the cutout.
-
Continue Upward: Continue laying shingles, working your way upward and overlapping each row according to the manufacturer’s instructions.
-
Ridge Cap: Once you reach the roof’s peak, install ridge cap shingles to cover the ridge vent and complete the installation.
By following these steps, you can effectively install asphalt shingles and ensure a durable, weather-resistant roof.

Repairing Roof Leaks
Repairing roof leaks promptly is essential to prevent water damage to your home. Here’s a simple guide to fixing common leaks:
-
Identify the Leak: Begin by pinpointing the source of the leak. Inspect the attic for water stains or damp spots during daylight hours. Trace the water path to locate the entry point.
-
Examine Roof Surface: Once outside, check the roof surface above the leak for damaged shingles, cracked flashing, or other visible issues.
-
Replace Damaged Shingles: Carefully lift the damaged shingles using a pry bar and remove any roofing nails. Slide a new shingle into place and secure it with roofing nails.
-
Seal Cracks and Gaps: Use roofing cement to seal any visible cracks or gaps in the flashing or around roof penetrations, like vents or chimneys.
-
Test the Repair: After completing the repairs, test them by running water over the area with a garden hose to ensure no further leaks occur.
By addressing roof leaks quickly, you can safeguard your home from extensive damage and maintain the integrity of your roof.

Ensuring Proper Roof Drainage
Proper roof drainage is vital to prevent water accumulation that can lead to leaks and structural damage. Follow these steps to ensure effective drainage:
-
Inspect Gutters and Downspouts: Regularly check gutters and downspouts for clogs caused by leaves, twigs, and other debris. Cleaning them ensures water flows freely away from the roof.
-
Check the Slope: Ensure your gutters are correctly sloped towards the downspouts. A slight downward angle helps water move efficiently.
-
Install Gutter Guards: Consider installing gutter guards to reduce debris buildup and minimize maintenance efforts.
-
Examine Roof Valleys: Clear any debris from roof valleys, where two roof sections meet, as these areas are prone to water pooling.
-
Ensure Adequate Downspout Length: Downspouts should extend several feet away from the foundation to direct water safely away from the house.
-
Professional Inspection: Have a professional inspect your roof’s drainage system annually to identify any issues that may not be readily visible.
By maintaining proper roof drainage, you protect your home from potential water damage and extend the lifespan of your roofing materials.
